Modular raised bed system for Square-Foot Gardening
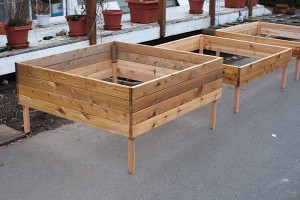
I created a short post a few weeks ago with directions for building a Raised Bed using the square foot gardening approach. I wanted to expand on that article by showing the three raised bed modules which I have designed and built, and show how they work together in our garden.

Overview of the three module types.
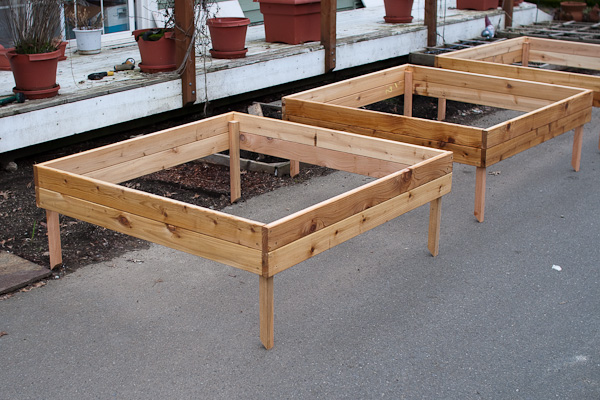
The first 5 beds in the garden which I built several years ago were Partially Raised Beds. To establish them, I dug down 12-20 inches to break up and enrich the existing soil. To increase planting depth, I built a 3.5″ riser of inexpensive Cedar Decking. This year, I have rebuilt / replaced them with 7″ risers made with two planks of the same Cedar Decking. They now match the height and exact dimensions of my fully raised beds. When all of the beds have the same dimensions, you can build accessories that work for all of your beds such as the 7″ riser described below.
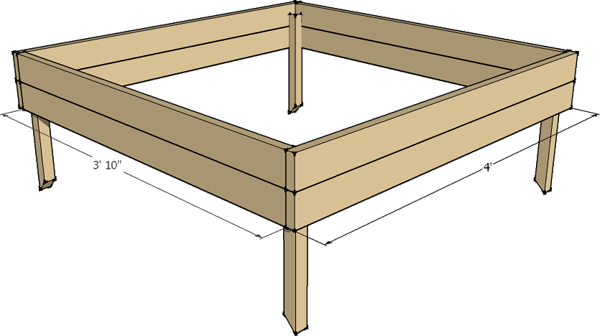
Materials for one partially raised bed:
-
4- 2″x2″x16″ vertical posts. Cedar. (5$)
-
4 – 3’10” sections Cedar decking.
-
4 – 4′ sections Cedar decking. (Decking is a nominal 4″ wide, actual dimension is 3.5″x1″) (4 boards @ 3.50 = 14$)
-
32 – 2″ Wood Screws rated for outdoor use. (1/4 of 8$ box)
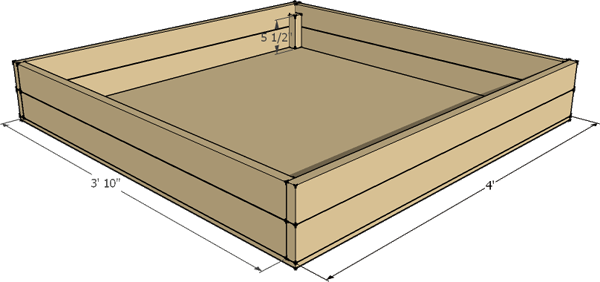
I already detailed the Fully Raised Bed design, so you should refer to that article for more details about it’s design.
Because both types of garden bed have the same dimensions and the same notched corners, I can create modules that sit on top of the standardized dimensions. The first modular component I built was a 7″ Riser which sits on top of a bed to increase it’s depth. So far I have built only one, and I made it as an aid to preparing a bed for the new year. By temporarily adding 7″ to the sides of the bed, it is buch easier to work the soil without spilling soil into the road. This is especially useful when significantly rejuvinating a bed or estabilishing it for the first time since you can rake the soil vigorously without worrying about making a mess. It has an obvious second use to raise the depth of a planter for a root crop. We plan to use at least one riser to plant potatoes in one of our raised beds this summer.
A riser is easy to build with the following materials, or you can build it with scraps based on this design:
-
4- 2″x2″x6.5″ vertical posts. Cedar. (Use scraps if you can… 5$)
-
4 – 3’10” sections Cedar decking.
-
4 – 4′ sections Cedar decking. (Decking is a nominal 4″ wide, actual dimension is 3.5″x1″) (4 boards @ 3.50 = 14$)
-
32 – 2″ Wood Screws rated for outdoor use. (1/4 of 8$ box)
Some tips in assembling raised beds:This year, I built two fully raised beds, rebuilt 2 partially raised beds and built 3 partially raised beds from scratch. Along the way I picked up a few tips to assemble them quickly and efficently:
- The easiest way to assemble the raised bed is to assemble the short sides first by screwing the 3’10” boards onto the 2″x2″ cedar vertical board. When assembling, make sure you leave space for the riser fit in the corners.
- It is useful to not only screw the boards onto the cedar 2″2″ but also use one screw on each corner connecting the edges. This seems to make the whole bed more stable.
- If you are committed to building many raised beds or other outdoor projects, just go ahead and buy the 5# box of screws. 8$ for a one pound box of screws is ridiculous. I learned the hard way.
- To slow deterioration, I applied a clear stain on the exterior facing sides of the box, and allowed several days for it to dry before installation. I would have stained all surfaces, but I do not have a non-toxic stain and I do not want chemicals leaching into the garden. (This soy-based stain claims to be non-toxic and is reasonably priced. If it extends the usable life of your raised bed by a couple of years it would be worth the cost. Unfortunately, I couldn’t find a local distributor easily.)
I hope these directions inspire you to create a first garden, or make your existing garden more efficient. If you have a better or alternate design, or suggestions to make this design better, let me know. If you find these instructions interesting or helpful, send me an e-mail or leave a comment! (email: Tom (at) tomalphin (dot) com) Thanks!


 TOM ALPHIN builds
You’ve put so much thought into your gardening apparatus. I love how passionate about all the growing things in our home!
I think this is a real great blog post. Great.
I build my own beds very simular to your raised bed. One problem I have (which seeme missing in your photos is the floor. How do you attach the floor to a raised bed in a way that the weight of the soil (and water) don’t break the bed?
Glenn: I built my raised beds some years ago, but if I remember correctly the plywood base is 4×4′ and the raised bed has an outer dimension of 4×4′ also/ As such, I could simply flip the bed over, and use wood screws to attach the plywood base to the wooden frame.
In other words, you can see the plywood base from the sides if you look for it. I thought they might rot-out too quickly, but they are about 5 years old at this point (I built my raised beds the year before I wrote up this post.)