Posts Tagged ‘Gardening’

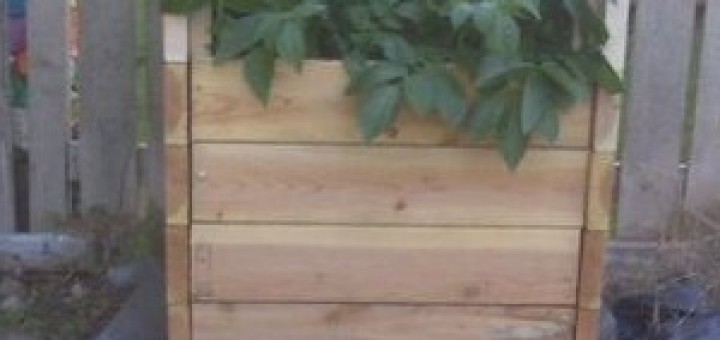
Growing Potatoes, vertically!

February 26th, 2010

Vertical Potato Bin, photo by Sinfonia

This year, we are trying something new in the garden, POTATOES.   Given that potatoes are cheap and readily available at the store, and they can be easily purchased from a local source year round, Why Potatoes?

  1. Amy loves potatoes, 
  2. It involves an interesting new growing technique where we will encourage growth all season by growing vertically, 
  3. Because we can.
  4. There is some concern that potatoes, since they are a root vegetable, have a greater risk of picking up nasty chemicals from overfertilized or polluted soil.


So, what’s this about growing potatoes vertically? 

It’s rather simple, really.  A potato plant will produce significantly more potatoes in the same Square Foot area if you add soil upwards as the season progresses and the plant grows taller.  Production can go up significantly; there are claims of up to 100 pounds of potatoes in 4 square feet of growing space.  (I suspect that the planty stem of a potato can send out roots when it comes into contact with additional soil, just like tomato plants.  Both potatoes and tomatoes are in the nightshade family.)

We are going to dedicate 16 square feet, and I would be thrilled to see 100 pounds of potatoes in that larger area, that’s just 1/4 of these enthusiastic claims.  (Important note: Early potato varieties set production once for the whole season, so you would only get one thin layer of potatoes underneath a deep pile of dirt.)

We will be dedicating one of our ten beds to this project.  The bed itself is 7″ deep, but I have already built one 7″ riser which will stack on top.  The riser and bed follow my Modular Raised Bed System for Square foot gardening.  I will have to build a few additional risers as the summer progresses, but I may build them with scrap lumber instead of buying fresh cedar decking to save money and resources.  (Since the soil will only be in contact with the wood for a few months, rather than year round, I expect even untreated pine would last several years in this method.)

I will be ordering “Yellow Finn” variety seed potatoes from Seed Savers Exchange.  A 2.5 pound bag of seed potatoes (10$ + S/H) is described as enough for a 25′ row, so I think it will be more than enough for 16 square feet.  I may be able to share if someone is interested.

Links:

A living room jungle

February 24th, 2010

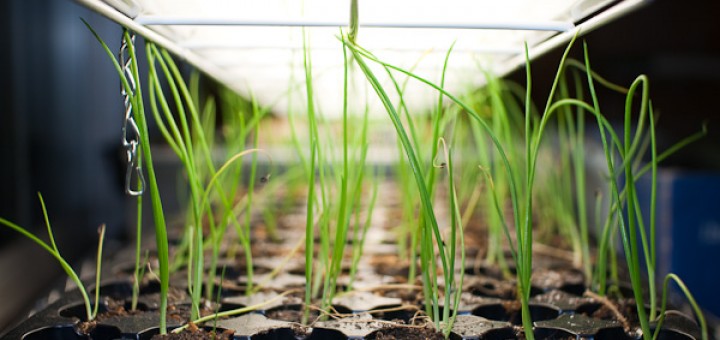
These enthusiastic onions under supplemental light will get planted out in March. (This flat includes green onions, walla walla onions, shallots and leeks)

Our starts are doing well.  We now have two shelves filled with plants which just keep on growing.  I have begun to acclimate a few hardy plants such as lettuce and leeks.  They will spend part of the day outside under a plastic dome.  After about a week where the outdoor time is increased every day, they will be ready to plant outside.  This is called “hardening off” the plants.

Tomatoes and Basil plants nearing 6 inches tall.

As for the less than hardy plants such as tomatoes and peppers, they keep on growing indoors too.  My largest tomato plants are about 8 inches tall, as they approach two months old.  I think that they will need to be replanted in larger containers atleast once before they can go outside for good.  Although it pains me to admit a mistake, January 1 is clearly too early to start your tomatoes.  They will probably be fine if I transplant them into a larger container before they get root bound, but they will be extremely large by May.  I am curious to see how much more production I get with extremely established starts like this.

Sage develops it’s characteristic crinkly leaves within a month. (left)  Peppers germinate and grow slowly but surely.  They might benefit from supplemental heat. (right)

Building Raised Beds

January 12th, 2010
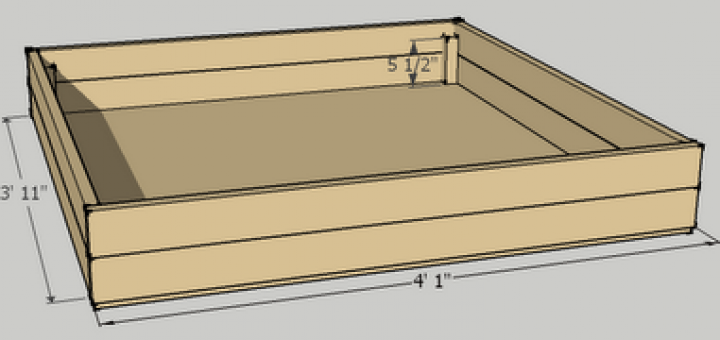
I thought it would be useful to include the schematic I used in building my newest addition to the garden in the form of three 7″ tall 4′x4′ raised garden beds which I built in the fall. You can make two raised beds following this template with the following materials:
  • (1) 4′x8′ 1/2″ or 3/8″ Plywood. Cut in half. (10$)
    1/2″ is cheaper, but 3/8 will last longer. May depend on if you want to move it or simply provide a barrier for weeds.
  • (8) 8′ long 4″ Cedar Decking. Cut into 4’1″ and 3’11″ sections. (3.50$ x 8 = 28$)
    These are 1″ x 3 1/2″. This allows you to use a complete section across the front of the box for aesthetics.

    Note: In my experience, 8′ long cedar decking is between 1/2 and 3/4″ longer than 8′. I don’t cut off the extra, I just make sure that one board is 2″ longer than the other.  (ex: ~4′ 1 1/4″, ~3′ 11 1/4″)

  • (1) 8′ long 2×2 Cedar. Cut into 8 5 1/2″ sections. (4$)
    These are used to reinforce the corners. You could make them the full 7″ tall, but this would not allow you to stack modular risers on your bed. I will talk about these later.
  • (1) 1lb box of 2″ outdoor rated wood screws. (8$)
    For attaching cedar to the corner braces.
  • (1) 1lb box of 1 3/4″ outdoor wood screws. (8$)
    For attaching the plywood base, and for the corners.
  •  Total: 58$, with plenty of screws left over for atleast two more beds.
One of my three raised beds on December 6th containing Garlic, Shallots and Greens.
These are in addition to the 5 partially raised garden beds which I established in previous years. I built these beds with a plywood bottom because I simply placed them on top of the gravel along the side of the house. These beds occupy one of the two most parking spots on the property, so I did not want to make them permanent as they may not be desired when it is time to sell the house.

Seeds!

January 10th, 2010
I finished reading through my seed catalogues and cross referencing the offerings against my Maritime Northwest Garden guide.  My goal was to increase both the variety, quality and uglyness* of this year’s garden.  I found that Seed Savers Exchange had the most seed varieties I wanted to get this year, so I will be ordering from them.

*Heirloom tomatoes are less attractive thain their mainstream siblings, but can be more flavorful.

Item
Price
Kraft White Self-Sealing Env. , 50 Envelopes (3.25×4.75″) $5.00
Collection, Sunflower $13.50
Carrot, Danvers OG, Packet 250 seeds $2.75
Arugula, Sylvetta , Packet 500 seeds $2.75
Broccoli, DeCicco , Packet 50 seeds
$2.75
Broccoli, Romanesco , Packet 50 seeds
$2.75
Lettuce, Reine des Glaces OG, Packet 250 seeds
$2.75
Pepper, Marconi Red , Packet 50 seeds
$2.75
Chard, Five Color Silverbeet OG, Packet 100 seeds $2.75
Runner Bean, Sunset , Packet 25 seeds $2.75
Tomatillo, Purple de Milpa OG, Packet 25 seeds $2.75
Tomato, Stupice , Packet 50 seeds $2.75
Tomato, Siberian OG, Packet 25 seeds $2.75
Tomato, Black Krim OG, Packet 25 seeds $2.75
Tomato, Green Zebra , Packet 50 seeds
$2.75
Herb, Rosemary , Packet 100 seeds $2.75
Herb, Green Culinary Sage , Packet 250 seeds
$2.75
Total:
$59.75

That’s a lot of money for seeds!  I need to see if someone wants to share some of these seeds with me.  I will gladly share a seed packet with anyone in the area for half the price.  I may also need to remove a few packets from my order before clicking ‘Buy”.

Thankfully, a seed packet will generally last 3-5 years.  I am still successfully germinating seeds from 2005, and I haven’t made any great attempt to preserve my seeds.  Going forward, I am going to store my seeds in an airtight box with a few of those desicant gel packets in it to keep everything completely dry.  I should store it in a cool dry location to increase the duration where they will be viable.

Seedy Thoughts…

Gardening in a Small Suburban Home

January 9th, 2010

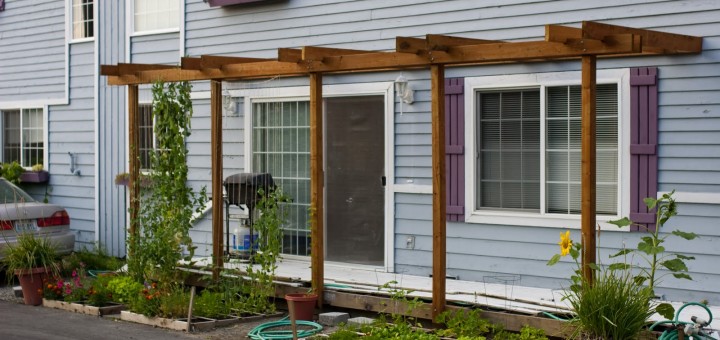
In 2006, inspired by the book “The all new Square Foot Gardening” I began gardening in earnest along the side of our small suburban home.  I began with four 4×4 foot partially raised beds.  They were established in the four foot area of gravel between the deck and the small road which goes by our house to access 8 homes. 

The garden’s first year was the same year that I added the pergola.

 The first year I established beds about 12 inches deep.  I achieved this by removing the layer of gravel on top, then digging a square 4×4 foot hole to about 8 inches deep.  I put the soil aside on a tarp on the road.

Soil

To remove rocks and break up the heavily compacted soil which had a good deal of clay in it, I built a Soil Sifter of wood and a coarse metal screen called “hardware cloth”.  It slides on a platform which I place over the planting area.  The screen removes anything larger than a centimeter, and I have since created an insert for situations where I want to sift the soil even finer.
Breaking up the soil and removing rocks with the Soil Sifter which I built.

I added a quarter of a large bag of Vermiculite (about a cubic foot), about a cubic foot of Peat Moss to each bed, and about two cubic feet of compost. This resulted in a 12 inch deep bed of loose composition which exteded 4 inches above the original soil level.

Note: I did not recreate the “Mel’s mix” ratio of 1/3 compost, 1/3 vermiculite and 1/3 peat moss which the square foot gardening book recommends; partly because it seemed overkill and partly because isn’t very cost effective given the high const of peat moss and vermiculite. 
More recently, I have even greater concerns with his guidance. Peat moss is a hard product to harvest sustainably, and vermiculite is neither local or especially sustainable.  My mixture, which uses a good deal more locally sourced compost than recommended, along with existing soil and a little peat/vermiculite has worked well for most of my crops.  It also saves money.

Deeper beds?
I am constantly working to increase the depth and richness of the soil.  My general approach to enriching the soil has been to make each bed deeper by removing and putting aside the enriched soil, then digging the hole deeper than the previous year.  The hard packed soil and clay I remove is filtered and mixed with the enriched soil and additional compost to fill the hole back up.  At this point, three of my five beds are 18 or more inches deep.

To be honest, I have not done any analysis to determine if the deeper beds perform better than the shallower ones.  One thing I have noticed however is that the deep beds settle significantly more over the growing season.  In the most extreme case, one of my beds ended this season 3 inches shorter than at the beginning of the season.  Some of this can probably be attributed to material leeching into the surrounding soil, some is lost to the plants produced during the year, but I suspect the majority is simply the result of the soil settling during the year.  I will certainly loosen the soil before replanting next year to keep it from getting permenantly compacted, but I do think a certain amount of settling is normal.

One topic that continues to baffle me is “Soil Structure”. The Maritime northwest garden guide states that it is important to both rotate your crops to prevent diseases which target a particular type of crop, and to not overwork the soil as it can damage the soil structure.  I do not entirely understand what soil structure is, and why an established garden with a specific siol structure ould outperform a new garden with the same soil fertility.  I am going to try and implement a basic crop rotation, as the benefits make sense, but for now, I will continue to rework the soil every year until I understand better.  (I’m sure that this is similar to why you shoudn’t scrub a cast iron pan.  Over the years the pan develops a natural nonstick coating which is difficult to recreate quickly, but easy to scrub off.)

Just a Hobby…
The time spent gardening I give up freely.  At this scale, it is just an edible hobby.  The value of a year’s production is probably close to my annual expense.  I have estimated my annual expense around 150$ per year, over the 4 years I have been gardening.  Some years I just add compost to re-enrich the soil, but others I have added watering systems, additional beds, or bought a lot of seeds.

Favorite Crops…
Our favorite crops are those which produce well with little cost and effort. 

Snow Peas in the Spring and Fall and Pole beans in the heat of Summer are our bumper crop, easily producing enough beans most weeks to use in 3 meals. The back row of each of our beds is dedicated to beans, with strings supporting their growth up to the pergola.

Tomatoes are also a favorite, anthough the relatively short Seattle summer has made them iffy at best.  We tend to have no tomatoes util the very end of August, when we are inundated with production.  Unfortunately, more than half the flowers which form into tomatoes do not reach maturity on the vine.  Thankfully, many do ripen completely if brought inside and placed by the windowsill.  This was a great discoverly as we tried it this year for the first time.

Basil is also difficult as it likes hot sunny days.  We tend to see plenty of it in August and September, but sometimes it does much better than other years.

Spinach in the early spring and lettuces in spring and fall.  Not a high value crop, but a salad or sandwich with fresh lettuce is something to be proud of.

Carrots! (and an Amy!)
"left" style="text-align: center;">

Carrots and Onions.  Again, these are not expensive crops in the store, but onions in particular grow well with little cost and maintenance, and you can cure them in the garage and consume through the early winter.  Carrots can stay into the ground until you need them or until a very hard frost.  It is fun to pull out a good looking carrot in December when everything else looks pretty dead.

Some years, we have gotten a good crop of Bok Choy, but recently we have had issues with either being eaten by bugs, or bolting to seed too quickly.

Peppers have never been productive for us.  We tried Okra this year on a whim (and a 50 cent seed packet) and got three okra pods out of two plants.  Novelty, but not something to rely on.  Squash has also been tough for us.  I think that it needs more space than we have been willing to give it.

Resources…

In addition to the Square foot gardening book itself which was an inspiration for my garden, The most useful guide to gardening in the northwest is the aptly titled “Maritime Northwest Garden Guide” prepared by Seattle Tilth, a local organization which helps people grow their own food locally, organically and sustainably.  It is based around an annual calendar, which a chapter calling out wat you should be doing each month of the year.  It incudes recommendations on when you should start seeds indoors, when you can plant other seed types indoors and specific seed and plant varieties that have been tested and proven in the Seattle Area. 
My primary gardening resources.
Beyond this, Seed Catalogues offer a good deal of inspiration, and a source for more options than your local Home Depot. (although I buy many of my other supplies there.) 
  • Seed Savers Exchange is an interesting organization which specializes in unique and specialty seeds.  Many of their seeds are organic, and members gain access to a network of hobby gardeners which offer up additional seed varieties.
  • Territorial Seed is a large seed manufacturer and distributor in Oregon.  The offer many varieties which are especially well suited to this region.  It turns out that chemical/agricultural giant Monsanto bought this and many other seed companies in 2005, but I do not think that this prevents them from producing the same quality, non GMO seeds which they built their business on.  Territorial Seed also has a sister company, the Abundant Life Seed Company, which sells only Organic seed.

Book Review: Animal, Vegetable, Miracle

September 27th, 2009

I finished reading the book ‘Animal, Vegetable, Miracle’ a few days ago, one of things which inspired me to increase our garden from five 4′x4′ vegetable garden beds to eight.   The three new beds are fully above-ground with a plywood base sitting on part of the gravel where I had been parking my car.  There is room for two more beds, but then I wouldn’t even be able to park my car there in a pinch.  I’m excited, as I planted garlic and shallots today, which will establish their root system over the winter, and develop a proper planty part in the spring.

As for the book, it is essentially 4 books in one, and I had a different attitude about each element of the book. 

  1. On one extreme, the book includes significant “preachy” content about the (completely genuine) horrors that CAFO’s make our meat, and the legitimate concerns about a society which values everything ripe at all times, no matter the fuel required to enjoy asparagus in December.  This is important info, but I don’t enjoy the constant reminders.
  2. Another element is a genuine narrative about their lives.  I did not find this especially interesting, but it did tie the story together.
  3. The most compelling part for me is the detailed recount of the actual process required to grow your own food for a year, or source it from your community.  I enjoyed learning about their experiences raising (and processing) chickens and turkeys, learning to make mozzarella, finding suprising spring foods at the farmers market and the details of a large near-sustinance farming experiment.
  4. There were also excerpts from her daughter, whichprovided short stories from an alternate perspective, followed by some recipes that follow the seasons appropriately.  I made some dried tomatoes following one of the recipes, and will try to make a sundried tomato pesto sometime after fresh tomatoes are no longer outside and at the farmers market.

Overall, I enjoyed the book, but enjoy more the rejuvenated entusiasm in my own garden.