Archive for January, 2010

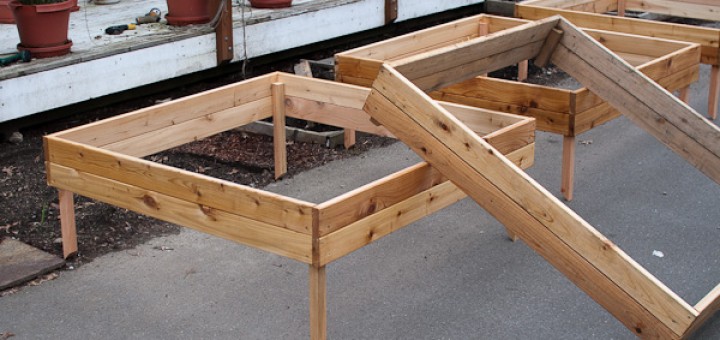
Modular raised bed system for Square-Foot Gardening

January 31st, 2010

I created a short post a few weeks ago with directions for building a Raised Bed.  I wanted to expand on that article by showing the three raised bed modules which I have designed and built, and show how they work together in our garden.   

Overview of the three module types.

The first 5 beds in the garden which I built several years ago were Partially Raised Beds.  To establish them, I dug down 12-20 inches to break up and enrich the existing soil.  To increase planting depth, I built a 3.5″ riser of inexpensive Cedar Decking.  This year, I have rebuilt / replaced them with 7″ risers made with two planks of the same Cedar Decking.  They now match the height and exact dimensions of my fully raised beds.  When all of the beds have the same dimensions, you can build accessories that work for all of your beds such as the 7″ riser described below. 


 Materials for one partially raised bed: 

  • 4- 2″x2″x16″ vertical posts.  Cedar. (5$)
  • 4 – 3’10″ sections Cedar decking. 
  • 4 – 4′ sections Cedar decking. (Decking is a nominal 4″ wide, actual dimension is 3.5″x1″) (4 boards @ 3.50 = 14$)
  • 32 – 2″ Wood Screws rated for outdoor use.  (1/4 of 8$ box)

Three Assembled "Partially Raised Beds" before installation.

I already detailed the Fully Raised Bed design, so you should refer to that article for more details about it’s design. 


Because both types of garden bed have the same dimensions and the same notched corners, I can create modules that sit on top of the standardized dimensions. The first modular component I built was a 7″ Riser which sits on top of a bed to increase it’s depth.  So far I have built only one, and I made it as an aid to preparing a bed for the new year.  By temporarily adding 7″ to the sides of the bed, it is buch easier to work the soil without spilling soil into the road.  This is especially useful when significantly rejuvinating a bed or estabilishing it for the first time since you can rake the soil vigorously without worrying about making a mess.  It has an obvious second use to raise the depth of a planter for a root crop.  We plan to use at least one riser to plant potatoes in one of our raised beds this summer. 


 A riser is easy to build with the following materials, or you can build it with scraps based on this design: 


  • 4- 2″x2″x6.5″ vertical posts.  Cedar. (Use scraps if you can… 5$)
  • 4 – 3’10″ sections Cedar decking. 
  • 4 – 4′ sections Cedar decking. (Decking is a nominal 4″ wide, actual dimension is 3.5″x1″) (4 boards @ 3.50 = 14$)
  • 32 – 2″ Wood Screws rated for outdoor use.  (1/4 of 8$ box)


Some tips in assembling raised beds:This year, I built two fully raised beds, rebuilt 2 partially raised beds and built 3 partially raised beds from scratch.  Along the way I picked up a few tips to assemble them quickly and efficently: 

  • The easiest way to assemble the raised bed is to assemble the short sides first by screwing the 3’10″ boards onto the 2″x2″ cedar vertical board.  When assembling, make sure you leave space for the riser fit in the corners.
  • It is useful to not only screw the boards onto the cedar 2″2″ but also use one screw on each corner connecting the edges.  This seems to make the whole bed more stable.
  • If you are committed to building many raised beds or other outdoor projects, just go ahead and buy the 5# box of screws.  8$ for a one pound box of screws is ridiculous.  I learned the hard way.
  • To slow deterioration, I applied a clear stain on the exterior facing sides of the box, and allowed several days for it to dry before installation.  I would have stained all surfaces, but I do not have a non-toxic stain and I do not want chemicals leaching into the garden.  (This soy-based stain claims to be non-toxic and is reasonably priced.  If it extends the usable life of your raised bed by a couple of years it would be worth the cost.  Unfortunately, I couldn’t find a local distributor easily.)

I hope these directions inspire you to create a first garden, or make your existing garden more efficient.  If you have a better or alternate design, or suggestions to make this design better, let me know.  If you find these instructions interesting or helpful, send me an e-mail or leave a comment!  (email: Tom (at) tomalphin (dot) com)  Thanks!

Seeds are here…

January 30th, 2010

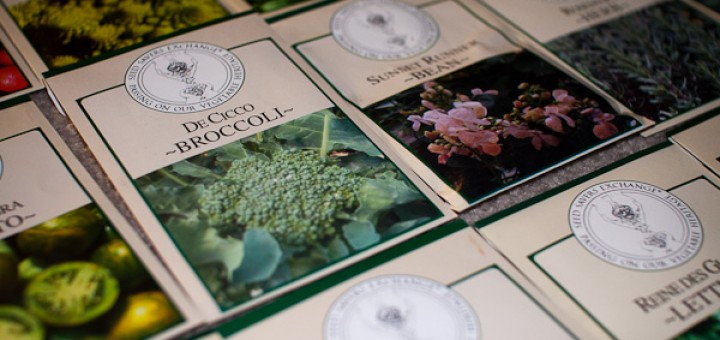
After splitting a major seed purchase with Alicia, I have a lot of new varieties to grow this year! 

 I am most excited about the new Heirloom Tomato varieties, the Runner Beans which should have brighlty colored flowers and yummy beans, and I am excited to grow broccolli for the first time.  I’m also enthusiastic to grow Chard and Tomatillos for the first time, and find out what to make with them.  We are also talking about trying a potato variety in one of our raised beds, which will also be something new and interesting.

Just a few of the new seed varieties that we ordered.  I’m especially excitedto grow things which are new.

My approach this year is to start seeds in a 72-seed starter tray, then transplant them into 4″ square pots as they outgrow the starter tray.  The starter trays are placed on a heat mat to raise the temperature by about 10 degrees from the temperature of the room.  They are covered with a clear humidity dome, andI am watering them by filling the tray with water and allowing it to soak up from below.  This doesn’t displace the seeds as watering from the top often does.  Starting with the second starter tray, I used a blend of compost, peat moss and perlite as my planting medium (The mix was sifted through hardware cloth to ensure that it was well broken up and debris-free.


Planting seeds into 72-cell starter trays.

Thus far, I have started 3.5 trays.  I did the first  tray in Jiffy peat pods with lettuces, tomatoes, basil, peppers, a few leeks, and some eggplant.   The Second tray was filled with young onions (18 Leeks, 18 Shallots, 18 green onions and 18 Walla Walla onions).  the third tray was filled only half way, with 3×3 blocks dedicated to Carrots, spinach and more.  The last tray contains the newest additions from this large order from Seed Savers, including my Broccolli (which germinated in only 2 days), heirloom tomatoes, additional pepper varieties, rosemary and sage. 

I have found that Peppers and Eggplants germinate extremely slowly (3 weeks), tomatoes take about a week, and broccolli takes only a couple days.

Updated Seed Inventory (a few varieties haven’t arrived yet.)

Seed Year Source
Arugula, Rocket 2007 Lilly Miller
Arugula, Sylvetta 2010 Seed Savers
Basil, greek spicy globe 2008 Botanical Interests
Basil, Lettuce Leaf 2008 Ferry Morse
Basil, Sweet Green 2005 Renee’s Garden
Basil, Sweet, large leaved 2009 Hart’s Seeds
Beans, Dow Gauk, Yard long bean 2007 Lilly Miller
Beans, Garden, Royal Burgundy (bush) 2008 Ferry Morse
Beans, Garden, Stringless Blue Lake (pole) 2006 Ferry Morse
Beans, Pole, Kentucky Blue 2009 Territorial Seed
Beet, Chioggia 2010 Seed Savers
Beet, Early Wonder 2007 Lilly Miller
Bok Choy, Green Delight Baby Bok Choy 2006 New Dimension Seed
Broccoli, Deciccor 2010 Seed Savers
Broccoli, Romanesco 2010 Seed Savers
Cabbage, January King 2009 Territorial Seed
Carrot, Danvers 2010 Seed Savers
Carrot, Paris market 2010 Seed Savers
Carrot, Scarlet (nantes type) 2006 Ferry Morse
Chard, Five color silverbeet 2010 Seed Savers
Corn, Sweet Corn, Early Sunglow 2009 Lilly Miller
Cucumbers, Tasty Green Hybrid 2006 Territorial Seed
Eggplant, Black Beauty 2006 Ferry Morse
Greens, Miner’s Lettuce 2009 Territorial Seed
Leek,  2010 Botanical Interests
Leek, American Flag 2009 Ferry Morse
Leek, Blue Solaize, 2010 Seed Savers
Lettuce, Black Seeded Simpson 2006 Ferry Morse
Lettuce, Black Seeded Simpson 2005 Seeds of Change
Lettuce, Butterhead, Tom Thumb 2009 Lilly Miller
Lettuce, Continuity Red Crisphead 2005 Seeds of Change
Lettuce, Green Deer Tongue 2009 Territorial Seed
Lettuce, New Red Fire 2009 Territorial Seed
Lettuce, Reine des Glaces OG 2010 Seed Savers
Lettuce, Speckled 2009 Seed Savers
Lettuce, Winterwunder 2009 Territorial Seed
Micro Greens, Mild Mix 2010 Botanical Interests
Okra, Clemson Spineless #80 2008 Ferry Morse
Onion, Evergreen Bunching 2009 Lilly Miller
Onion, Walla Walla Sweet 2009 Ed Hume Seed
Peas, Snap Pea, Cascadia 2009 Territorial Seed
Pepper, Aurora 2010 Seed Savers
Pepper, Marconi, Red 2010 Seed Savers
Radish, Red Silk 2005 Ferry Morse
Rosemary, 2010 Seed Savers
Runner Bean, Sunset 2010 Seed Savers
Sage, Green culinary 2010 Seed Savers
Shallot, Bonilla Hybrid 2009 Territorial Seed
Spinach, Bloomsdale Long Standing 2006 Ferry Morse
Spinach, Ginat Winter 2009 Territorial Seed
Squash, Early Prolific Straightneck 2008 Ferry Morse
Squash, Early Prolific Straightneck 2007 Ferry Morse
Squash, Straightneck Early Yellow 2008 American Seed
Sunflower, Autumn beauty  (#601) 2010 Seed Savers
Sunflower, Irish Eyes  (1088) 2010 Seed Savers
Teddy Bear Sunflower (#326)  2010 Seed Savers
Tomatillo, Purple de Milpa 2010 Seed Savers
Tomato, Better boy hybrid 2008 Ferry Morse
Tomato, Black Krim 2010 Seed Savers
Tomato, Blonkophchen 2010 Seed Savers
Tomato, Gold Medal 2010 Seed Savers
Tomato, Green Zebra 2010 Seed Savers
Tomato, Jubilee (yellow) 2008 Ferry Morse
Tomato, Mexico Midget 2010 Seed Savers
Tomato, Red Cherry, Large Fruited 2006 Ferry Morse
Tomato, Roma VFN 2008 Ferry Morse
Tomato, Siberian 2010 Seed Savers
Tomato, Stupice 2010 Seed Savers
Tomatoes, Brandywine (Sudduth’s Strain) #427 2010 Seed Savers

The secret life of a board game geek…

January 27th, 2010

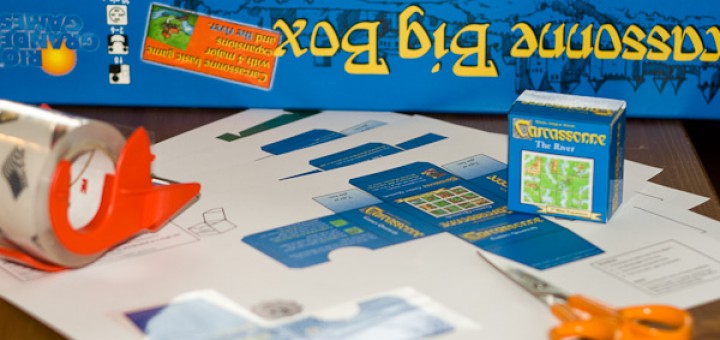
It’s true, I am famous on the internet!  To see how, you need to read further…

As noted in my recent article, I love board games!  One thing I didn’t have time to go into in that article are the many ”expansions” that have come out for many popular games.  Expansions breathe new life to a familiar game by adding new rules and generally add new game components such as advanced pieces, or a new map.  They generally increase the length and complexity of the game they expand, and they vary from a few dollars for a few cards and new rules, to nearly the same price as the game they expand.

As much as I love board games, I am addictied to expansions!  This is despite the fact that they rarely provide significantly more fun than the original game itself.  It’s worth calling out a few ppoular games to see how their expansions extend the gameplay experience:

  • The Settlers of Catan is the archetypal mainstream eurogame.  It has as many reissues, expansions, and spin-off games with similar rules as any other game.  The most famous expansion for this game is the Cities and Knights of Catan, which is on the higher end of the scale in terms of added complexity and cost.  It turns a game which can frequently be completed in around an hour into a game which frequently takes 2 hours or more.  I really enjoy this expansion, but it is practically a whole new, more complex game based on the idea of the original.  This is a good example of a large expansion which makes you really rethink your approach to the game.
  • Race for the Galaxy is a recent card game.  As I noted in my earlier article, it is complex to learn but fun to master.  It has two expansions so far, both adding relatively little new material and rules.  Unfortunately, the expansions are pretty pricey for what they add.  The first expansion, The Gathering Storm, simply built on the rules of the original, providing a little more options for growth, without changing the formula for success.  The second expansion,  Rebel vs. Imperium, added new attack mechanics which changed the tone of the game and increased the complexity a good bit.  Overall, both are examples of mid-sized expansions which evolve the game by adding new ways to win, without breaking old techniques.
  • Ticket to Ride is a fantastic game which has been recreated several times as a complete new game based on the original rules.  Spin-off games in the series include Ticket to Ride Europe which is the only edition we own.  Both the original game and the Europe edition have seen relatively small expansions (ex: Ticket to Ride: Europa 1912) which keep the original rules and map, but replace the destination cards used when playing the game to mix things up.  These small expansions often offer the least value despite their low cost since they only change the game in minor ways.  (That said, I don’t have Europa 1912, and I do look forward to getting it and being pleasently suprised.)

One of my favorite games, also turns out to be the king of expansions and spin-offs; Carcassonne.   It’s simple design and modular tile-based gameplay is easy to extend and reimagine. Carcassonne has seen 6 mid-sized expansions, 8 small expansions, 7 spin-off games (one is for children) and a card game only tied to the rest of the series by name.  I had collected every expansion and spin-off in the series until recently, when they released a poor game and a poor expansion in the series the same year.  The expansions alone are difficult to keep organized, since they all consist of square tiles which are difficult to distinguish from one another.

Tuckboxes?

This is why I am famous, if only amongst a small number of board game enthusiasts on the popular Boardgamegeek website.  To aid in my own organization, I designed a set of printable “tuck boxes” that store the tiles from one expansion so I can keep them separate from other expansions and the main game.  I designed boxes for a few of my favorite expansions quickly in PowerPoint, printed them on cardstock using a color laser printer and then folded and taped them into perfect little boxes.  Pleased with my work, I shared them with other Carcassonne players.

Assembling a Printable Tuckbox for Carcassonne which I designed.

What followed after sharing them on the web is a little strange.  I started getting emails from folks who found my tuckboxes on the web like the following:

I already have several your boxes (for the Cathars, River, the 3rd expansion, the 5th)
I would like you to ask for the others, do you have boxes for the 1st, the 2nd, the 4th

and…

I would like modify it so I can create my own tuck box for a different expansion.
When I updated the tuckboxes to include another expansion, I added a note indicating that I would like to locate a copy of the carcassonne expansion The Cathars, which was release several years earlier with the german gaming magazine Spielbox.  It wasn’t broadly available anymore, except on ebay for 40+ dollars a copy.
 
A short time later, I got an email from a generous gamer who loved my tuckboxes and offered me his extra copy of the Cathars and the Spielbox magazine for 10$ shipped.  I was amazed by his generosity, and the fact that someone appreciated my work enough to give me a special deal on a difficult to locate item:
I saw in your tuckboxes from boardgamegeek.com that you were wanting a copy of Cathars.  Are you still looking for one, or is this old information?
I have all of your tuckboxes, in fact, and use them to be able to store the entire game in the orignal box, which would be impossible otherwise.  …  I particularly like how you have put the expansion name on the top flap, since that is how I store the boxes in the main box.
If that wasn’t strange enough, there is a community of Carcassonne enthusiasts who are constantly producing fan-made expansions to the game.  I was contacted by one member of that community who wanted to use my templates to create tuckboxes for his fan-made expansions.

Tuckbox for a fan-made expansion made by someone else based on my design.
 
I have continued to get ideas, requests, thanks and general appreciation for my work via email and the boardgamegeek website.  It always makes me smile when I get another friendly message for my work. 
The latest addition to my Carcassonne tuckbox collection for the Tunnel expansion which came out in the fall.
 
So far, my collection of tuckboxes have been downloaded over 4700 times.  Yesterday, I released an update to the tuckboxes to include the latest expansion, The Tunnel, even though I don’t have a copy yet.  Only time will tell how the Carcassonne francise will grow, and  if I will be able to keep up with the never-ending expansions!
As always, if you found this interesting or have a question, please leave a comment on my blog or send me an email: tom (at) tomalphin (dot) com

First round of Seedlings.

January 20th, 2010

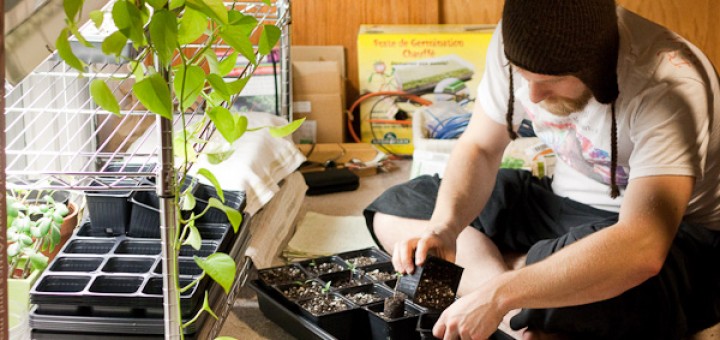
In addition to starting the new year with a frigid swim, I also planted my first round of seeds on January 1st. Here we are, 20 days later, and I have seedlings to show for my effort.

I am transplanting some of my seedlings to larger containers.

Because I am trying to increase our yields this year and the garden is doubling in size, I invested in a number of supplies to help establish stronger seedlings indoors for transplanting.   

  • To aid in Germination, I purchased a heated mat which sits beneath the nursery tray and heats the soil about 10 degrees above room temperature.  After the plant has sprouted, it does not need the warmer temperatures provided by the heat mat, so it can continue growing without the supplemental heat.
  • To make my transplantings go more smoothly this year, I purchased a large number of 4″ square plastic pots and standard nursery trays.  I will transplant my seedlings from the germination trays to these larger pots as they get too large for the starter trays.
  • To keep the plants from becoming spindly in their search for adequate sunlight, I invested in supplemental lighting.  I chose generic 4′ Fluorescent fixtures from Home Depot designed to hang from a chain.  I selected a fixture which uses the newer and thinner “T8″ bulbs as they are more energy efficient.  I did not buy specialty “grow bulbs”, as my cursory research online indicated that they weren’t significantly better, while almost 10 times as expensive.  As they are on a chain, I can adjust the light so it nearly touches the leaves of the seedlings.  From my investigations, it appears that seedlings need to be within 2-3 inches of the flourescent bulb to get adequate lighting and grow a thick, healthy  stem.
  • To  suspend the light fixtures and organize the plants, I purchased a Stainless Steel Wire Rack shelving unit.  It is 18 inches deep and 4 feet wide.  This allows 4 standard seedling flats per shelf, and easily accommodates the 4′ fluorescent fixtures. 

I will use this approach to raise many of the plants commonly started indoors like Tomatoes and Peppers.   They will grow indoors for months under supplemental light before they are ready to go outside.  The tomato plants I started earliest may need to be transplanted multiple times, from their 1″ starting pod, to a 4″ pot, and may need a 1/2 gallon pot before transplanting it outdoors.


I am also starting onions, leeks, green onions, shallots, carrots, cabbages, spinach and lettuces indoors to give them a head start.  I am planning to get them established indoors, then move them to the garden in late February under the protection of one of my three mini-greenhouses which fit over a square foot bed.  As the varieties I selected are all pretty hardy, I should be able to remove the protection provided by the Greenhouse after the last hard frost which is probably in April.

Cartooned!

January 17th, 2010

Over the holidays, we traveled to see Amy’s mom in Richmond, VA, to see her dad in Charleston, WV and got to see my parents before and after our east coast trip as they came out to Seattle for the holidays.  It was a lot of traveling, but one of the things we managed in between family time was to see some friends in Richmond.

One of the couples we got to spend some time are Amy’s best friend from forever Eva and her husband William.  They live in Philly but they were visiting family in Richmond as well.  We saw them twice and talked at length about what was going on in our various lives.  Somehow, one of hiking trips Amy and I took some years ago came up, as we encountered an unusually dressed person on the trail that day.  William found this extremely entertaining, and he portrayed our story today on his illustrated blog.

View our story on his blog, or see his latest drawing’s on William’s amazing illustrated blog, Drawing on Experience.

Backstory: For what it’s worth, the hike when this occured was on June 11, 2006 when we hiked up Sunrise Mountain towards Scorpion Mountain.  That day we got chased off the mountain by a thunderstorm, so we started hiking back to the car after a satisfactory lunch near the top of Sunrise Mountain.  On the way back, I was hiking a little ways in front of Amy and Brendan, and I said hello when I saw someone coming up the trail around a bend.  When they got around the bend, I realized that the person was a nude male in his 40′s or so, carrying a backpack.  I never made it far enough down to see if he was wearing shoes.  I was baffled by his lack of apparel, but continued discussing the weather.  “Be careful up there.”, “Oh, don’t worry about me, I think the storm is passing.” as if there was nothing unusual at all.  When Amy and Brendan caught up, they were having a harder time containing themselves.  We hiked on, certainly out of sight and maybe out of earshot and completely lost it, laughing out loud.  We discussed the experience after the fact, and none of us were offended by the encounter, it was just unusual, and funny.   I don’t know who we encountered this day, but there is atleast one nude hiker in the Seattle area who has a website where he explains why he choses to hike this way.

Board games that aren’t boring.

January 17th, 2010

I love board games!  Most of our favorite board games are fun to play, take around an hour to complete and are easy to learn.  Most of the games we play are broadly categorized as “german-style” or eurogames, which are generally designed for families or casual groups, and the focus of these games is usually to outperform your opponents, rather than directly interfere with them.

I enjoy games which contain a balance of tactics (making the best move right now) and strategy (making a move which doesn’t help me as much now, but helps me even more in the long run).  I tend to lose interest when a game is too biased towards Tactics, and I get frustrated when a game is too heavy on Strategy, as it can cause players to take really long terms as they consider all of their options and their long-term ramifications.  One of the best resources to learn about board games is the Board Game Geek website. (boardgamegeek.com)  Once you find one game which you like, it easy to find others you might enjoy by reading their detailed reviews and ratings.  You may also be able to find stores in your area that specialize in this style of games.  Their staff is generally very good at helping customers select a game they might like, and some stores have an open copy of the most popular games, so you can try before you buy.

A few of our favorite games:


Ticket to Ride is very easy to explain, but difficult to master. The game is played on a map with cities connected by possible rail routes. You start the game with tickets, each containing two cities which you are trying to connect. You connect the cities by laying town track between cities. You pay for the track by collecting resource cards of the corresponding color. The game ends when the first player runs out of track, and the player witht he most points from track and completed tickets wins.


Carcassone is a fast paced game where each player in turn adds a tile to the countryside, laying claim to fields, roads and cities as they go. As these features get completed, players earn points, and the highest score wins.


Settlers of Catan started the eurogaming revolution here in the US. It is a fairly complex game to teach, but once you get the hang of it, it can be a lot of fun. You begin with two settlements which are surrounded by the resources grain, brick, wood, sheep and ore. Each resource has a die roll associated with it, and you get resources when the corresponding numbers are rolled. You use resources to compete for roads, additional settlements, cities and more. The player who earns 10 points first wins.


Race for the Galaxy is actually a card game, abeit a complicated one. In this game, you are competing to control the galaxy by establishing settlements and developing enhancements to your operations. There are many different ways to succeed at the overall goal whihc is to have the most points, and in most games you employ more than one strategy. A complicated set of rules and symbols make this game particularly difficult to learn, but the great variety of strategies has kept us coming back after more than 60 games.

These are just a taste of the interesting games that are out there.  If you are interested, you can see all the games I own and most of the games I have played by finding my page or my collection of games on the BoardGameGeek website.

…the making of a Web page logo

January 16th, 2010

You may have noticed some changes in how my blog looks after my recent changes.  The most notable changes are:

  • A revised page header which includes a new “search” capability and a different treatment for the title text.
  • Different fonts for article titles and text.  In particular, i spent some time getting the hyperlink text to stand out from the rest fo the text.  If you look closely, the links are not only bold, they are another font entirely.
  • A new “What i’m writing about” block to the right which shows  topics based on how often I discuss them.

The final browser icon for my website.

Sadly, one of the details I spent the most time on is much less obvious than those broader design elements.  I decided to make a unique Web Page Logo for the blog, commonly known as a “favicon”.

If you are viewing this blog on a modern tabbed web browser, you will see a little logo for each web page in the tabs.  If I make no effort as a web designer, a generic logo is provided by the browser.  I decided this wasn’t good enough, and wanted to create something attractive but simple.  This was a difficult challenge, as you are limited to 16×16 pixels, which is excruciatingly small.

My inspiration for the logo is the strongly typographic logos used by a variety of web services today such as Facebook, Google and Bing.  I wanted something that fit somewhere between a literal ”letter in a box” and an abstract ”logo”.  I particularly liked the idea of text bleeding off the edge of a logo since it feels less rigid.

Browser icons from several popular web services.

As you can see, I went through several iterations before designing the final logo.   (I also tried a similar concept using the whole word “tom”, but 16 pixels was inadequate to fit the word in a readable manner.)  The final design is unique enough to aid in quick recognition, but is still logically tied to my name and the web site identity, since it uses the same color palette.

Since my WordPress theme came with a logo (left), I decided to make a more personal logo.

Moved to WordPress

January 13th, 2010

I have moved my blog over from the Blogger platform to WordPress.  I chose wordpress as it is well known for good typographic control and extensibility.

I think it will be flexible to achieve my goal for the blog, showcasing all of my posts at the tomalphin.com website, but eventually offering readers who only care about one of the topics I discuss to read and subscribe to just that part of the blog. I hope that wordpress will allow me to use a slightly different visual style for each of these sub-pages.

In the meantime, please excuse the rough edges. I plan to personalize the template soon to give it a personal feel. I just picked the first decent template I found.

Building Raised Beds

January 12th, 2010
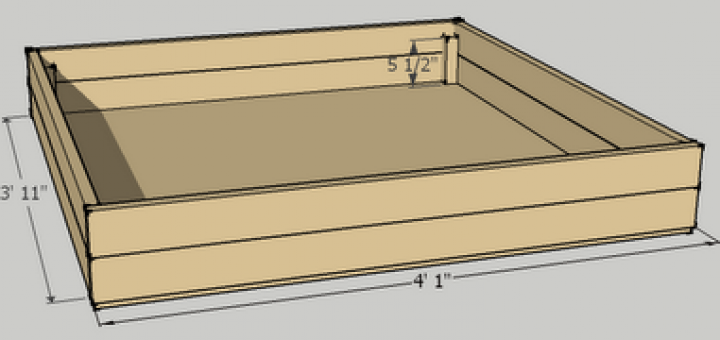
I thought it would be useful to include the schematic I used in building my newest addition to the garden in the form of three 7″ tall 4′x4′ raised garden beds which I built in the fall. You can make two raised beds following this template with the following materials:
  • (1) 4′x8′ 1/2″ or 3/8″ Plywood. Cut in half. (10$)
    1/2″ is cheaper, but 3/8 will last longer. May depend on if you want to move it or simply provide a barrier for weeds.
  • (8) 8′ long 4″ Cedar Decking. Cut into 4’1″ and 3’11″ sections. (3.50$ x 8 = 28$)
    These are 1″ x 3 1/2″. This allows you to use a complete section across the front of the box for aesthetics.

    Note: In my experience, 8′ long cedar decking is between 1/2 and 3/4″ longer than 8′. I don’t cut off the extra, I just make sure that one board is 2″ longer than the other.  (ex: ~4′ 1 1/4″, ~3′ 11 1/4″)

  • (1) 8′ long 2×2 Cedar. Cut into 8 5 1/2″ sections. (4$)
    These are used to reinforce the corners. You could make them the full 7″ tall, but this would not allow you to stack modular risers on your bed. I will talk about these later.
  • (1) 1lb box of 2″ outdoor rated wood screws. (8$)
    For attaching cedar to the corner braces.
  • (1) 1lb box of 1 3/4″ outdoor wood screws. (8$)
    For attaching the plywood base, and for the corners.
  •  Total: 58$, with plenty of screws left over for atleast two more beds.
One of my three raised beds on December 6th containing Garlic, Shallots and Greens.
These are in addition to the 5 partially raised garden beds which I established in previous years. I built these beds with a plywood bottom because I simply placed them on top of the gravel along the side of the house. These beds occupy one of the two most parking spots on the property, so I did not want to make them permanent as they may not be desired when it is time to sell the house.

Seeds!

January 10th, 2010
I finished reading through my seed catalogues and cross referencing the offerings against my Maritime Northwest Garden guide.  My goal was to increase both the variety, quality and uglyness* of this year’s garden.  I found that Seed Savers Exchange had the most seed varieties I wanted to get this year, so I will be ordering from them.

*Heirloom tomatoes are less attractive thain their mainstream siblings, but can be more flavorful.

Item
Price
Kraft White Self-Sealing Env. , 50 Envelopes (3.25×4.75″) $5.00
Collection, Sunflower $13.50
Carrot, Danvers OG, Packet 250 seeds $2.75
Arugula, Sylvetta , Packet 500 seeds $2.75
Broccoli, DeCicco , Packet 50 seeds
$2.75
Broccoli, Romanesco , Packet 50 seeds
$2.75
Lettuce, Reine des Glaces OG, Packet 250 seeds
$2.75
Pepper, Marconi Red , Packet 50 seeds
$2.75
Chard, Five Color Silverbeet OG, Packet 100 seeds $2.75
Runner Bean, Sunset , Packet 25 seeds $2.75
Tomatillo, Purple de Milpa OG, Packet 25 seeds $2.75
Tomato, Stupice , Packet 50 seeds $2.75
Tomato, Siberian OG, Packet 25 seeds $2.75
Tomato, Black Krim OG, Packet 25 seeds $2.75
Tomato, Green Zebra , Packet 50 seeds
$2.75
Herb, Rosemary , Packet 100 seeds $2.75
Herb, Green Culinary Sage , Packet 250 seeds
$2.75
Total:
$59.75

That’s a lot of money for seeds!  I need to see if someone wants to share some of these seeds with me.  I will gladly share a seed packet with anyone in the area for half the price.  I may also need to remove a few packets from my order before clicking ‘Buy”.

Thankfully, a seed packet will generally last 3-5 years.  I am still successfully germinating seeds from 2005, and I haven’t made any great attempt to preserve my seeds.  Going forward, I am going to store my seeds in an airtight box with a few of those desicant gel packets in it to keep everything completely dry.  I should store it in a cool dry location to increase the duration where they will be viable.

Seedy Thoughts…