Archive for October, 2009

Low-cost, highly personal iPhone Case.

October 29th, 2009

I got a used iPhone from Lisa, (Thank you!) and I have been enjoying the device quite a lot.   In short, it’s a great “lifestyle” device but a so-so phone.  That is a reasonable tradeoff for me, since i make relatively few calls.

This phone is the first generation iPhone, so I don’t get a GPS, or fast 3g data. It also has a crack in the digitizer, but it is in the lower-left corner and not very distracting.  (The digitizer is the glass pane above the screen itself which receives the touch inputs.  On the new iPhone, this is  separate 15$ part that you can replace with some saavy, on this generation, it is glued to the screen itself, so a replacement would cost 100+ dollars, which I am not convinced is worth it.)

I ordered a charging cable online, since I wasn’t that concerned about how the charger looks and feels in everyday use, but I wasn’t really interested in buying a 30$ case for the phone, and the 5$ cases look pretty lousy.  That said, I didn’t want to break the device before buying a case.

I gave myself 10 minutes the other day after lunch, to fashion a makeshift case out of the cardboard backing to an empty legal notepad. I placed the phone face-down in the middle of the cardboard, and traced the outline of the phone.  I drew a circle roughly where the home button is, a big square for the screen and a slit for the speaker, and cut them out with an x-acto.  I made slits at the corners with a pair of scissors, scored the four edges and folded it around the phone.  A couple pieces of scotch tape finished the task in a total of 7 minutes.  The holes for the volume, docking port and camera came later, as did the personalized front plate which was implemented with ink and sharpie.

This was easy and fun, and the case is extremely replaceable.  It has even proven itself already in a 2 foot fall (Sean!) onto a hard table.

Processing Digital Photos, from the Camera to Screen or Print

October 25th, 2009

Anyone who takes a lot of photos knows that the time spent behind the camera is only one small step to getting an image you are proud of onto the web or printed.  Higher-end cameras tempt you to make this process harder by capturing your photos in their RAW format whihc requires processing to get the photo into the industry standard JPEG format which you can send to your friends and your mom.

The leader in RAW processing is Adobe with their popular Adobe Photoshop Lightroom application, now in version 2.  Lightroom makes it possible to assign tags to your photos, rate them and apply improvements to the colors, brightness and contrast before exporting a JPEG file to post to your blog or to send to the printer. 

Workflow:
While Lightroom is more powerful and easier to use than some of it’s competitors, I would hardly call it “easy”.  Photographers describe the myriad of steps they use to take a RAW digital photo on the camera and turn it into something that they can share “Workflow”.

My workflow is probably less complex than most professional photographers, but it is still cimbersome enough that I regularly get months behind in processing my photos.  My workflow begins in the first tab in Lightroom labeled “Library”.  In this phase, my goal is to 1) label the photos appropriately so I can get back to them in the future and 2) identify those photos which are good enough to share, and those which look like they could be great.

1) Labeling
To label the photos, I assign tags to the people in the photo, and will sometimes add a short description of the photo.  This is also when I try to assign the location where the set of photos was taken by specifying the Country/State/City/Location.   Recently, I have tried to assign coordinates to my photos by using clever software that uses a tracklog with the timestamp on the photo to interpolate where the photo was taken. (A tracklog is a recording on a GPS device of where you are every 30 seconds.)  Lightroom should really include built-in support for this, but in the meantime a person named Jeffrey Friedl has created a Lightroom plugin to assign the coordinates where a given photo was taken based on a tracklog from the same period. 

I also assign a Star rating to the photos which I like.  Roughly speaking, I assign 2 stars to any photo which is either decent, or a poor quality image that is important to tell the complete story of an event.  I try to assign 3 stars to the best 2 to 4 photos of a given event.  These are good photos, but not my best.  4 stars is meant to mean “excellent”, a photo which is great both in subject and composition.  5 stars is a concept I challenge with.  I know my photos could always be better so I am hesitant to give anything this rating.  I do take good photos, so I should me more willing to rate a few photos a year “5 stars”

2) Processing
After tagging, I must process the photos.  This varies greatly from photo to photo, but the most common changes I make are an adjustment to the brightness of the image, the increase of Contrast, and tweaking the balance of brightness and contrast in the shadows.  I also use the Neutral Density Gradient filters pretty often to correct a blow-out sky.  If none of this is enough to make the subject, usually someone’s face, bright enough or having enough contrast, then I will use the localized tools to correct the broghtness / contrast in an area of the image.  Both of these localized edits are new to Lightroom Version 2

Finally, after tagging and processing, I export my photos which are 2 stars or greater into my public photo library.  This generally yields 1/2 to 3/4 of the original photos.  When I export photos, I keep the standard resolution and set the JPEG compression settings to 80 of 100.

When friends and family pop the question…

October 20th, 2009

“… I am planning to buy a Digital SLR, what should I buy?”  I’ve received variations of this question from friends and family recently.  It is a difficult question to answer because it’s actually the wrong question.

The reason is best explained in an example:
People who are new to photograhy might say “nice camera” to a photographer using a SLR, but photographers rarely comment on another photographers camera, they would instead comment “nice lens!”  This is in part a reflection on the fact that most high-end lenses cost more than the camera that is attached to it, but it is also reflected in the photos you can take.

To make a long story short, the cheapest Digital SLR on the market can take beautiful photos with a high quality lens, but the best camera will take relatively poor photos when coupled with a cheap lens under anything less than ideal conditions.

So, what should they ask?
The decision to Buy an SLR is a decision to buy-into the idea that the best lens for each situation is different.  A single lens of exceptional quality that captures a lot of light across a broad range of focal lengths (zoom) will have two problems: It will be exceedingly heavy and large, and it will be astronomically expensive. 

  • If you want a one-size-fits-all solution, you would be better served with the highest-end point-and-shoot camera with a built-in lens.  There are excellent options in this category such as the Canon G10 and Panasonic LX3 which both offer a failry standard zoom range and excellent image quality.  If you want more zoom (20x) and will accept slightly degraded inage quality, several products offer great value.  (Many even offer RAW capabilities, which I will describe more later.
  • If you do like the idea of interchangeable lenses, but the size of an SLR is overwhelming, it’s worth exploring the new Micro-4/3 system in camera such as the Panasonic Lumix GF1.
  • If you’ve cosidered your options, and still think an SLR is right for you, then the important question you should answer is “what do you want to take pictures of?”.

Picking the lens(es):
Before you pick a camera, determine what lenses you need.  I will only cover the most common categories for someone new to SLR Photography: Midrange Zooms, Midrange Primes, and Telephoto Zooms.

  • Fixed-length Prime: A Prime lens is a fancy way of saying it cannot zoom in and out.  Prime lenses almost always result in better picture quality when you factor in the cost of the lens. Further, an inexpensive fixed-length lens can often produce great results whereas a inexpensive zoom lense will produce poor results in anything less than perfect conditions. (100$ or much more.)
  • Mid-range Zoom: This is the most common lens people use since most SLR’s come with a “kit lens” in this range. They range from reasonably wide (~20mm) to reasonably zoomed in (~100mm). The lower-end lenses in this category are often not very sharp, and photos can have weird effects that are hard to describe. (lens flares, spots in the image, rainbows on sharp lines of contrast, etc…) The lower-prioced lenses also are “slower”, meaning they gather less light, so the lens must remain open longer to get enough light to capture the picture. The generally work alright outdoors but are difficut indoors when there is less light. The excellent lenses in this range are very expensive (500$ or a good deal more.)
  • Telephoto Zoom: A Telephoto lens is used to take pictures of things that are far away. (80mm or greater) While it is possible to achieve good photos with a less expensive lens in the mid-range, a inexpensive zoom will be extremely frustrating. I would not worry about getting a telephoto zoom initially unless wildlife photography is something you really want to do.  A reasonable telephoto zoom lens will start around 500$ and increase as you add Image Stabilization, (which is especially important for a zoom lens) a faster lens and sharper optics.
  • Wide-angle Zoom: A wide-angle lets allows you to capture a large scene in a single shot.  Due to the complexity in bending a broad scene into a single frame, these lenses tend to be expensive, and are only so sharp.  Further, a photograph taken with a wide-angle lens can have a distorted effect, since a scene that bends around you is being captured on a flat surface.  The best results are usually achieved in natural environments without people, as the distortion is less noticeable.

So, What do we use?

We have a fairly straightforward kit: 2 mid-range primes, a Telephoto Zoom and a Wide angle Zoom.
  • Mid-range Prime: Canon EF 50mm f/1.8 II ~100$ – This lens is extremely inexpensive and sharp.  50mm is a mild zoom given the crop factor of sub-2000$ Digital SLR’s, so it is great for portraits of people or many scenes around town or out in nature.
  • Mid-range Prime: Sigma 30mm F1.4 EX DC HSM ~ 375$ – This is our favorite lens for everyday use.  30mm is just a hair wider than natural, so most scenes fit into the picture, both indoors and outside.  This ultra-fast F/1.4 lens makes it possible to take photos indoors without a flash, and you can drop it down to a modest F3 to get exceptionally sharp photos outside.
  • Telephoto Zoom: Canon EF 70-200mm f/4L USM ~ 550$ – This is the sharpest lens we have and the only lens we have in Canon’s famously sharp “L-series”.  I chose it based on the comparably low price, and the relatively low weight which makes it great for hiking.  At only F/4, this lens requires bright sunlight to get the shot. 
    • We would be better suited by the Image Stabilized version of the same lens. (f/4L IS, 1050$) It keeps the same low weight, but allows you to take sharp photos of a non-moving subject with about 1/4 the light.  The price difference is staggering.
    • We would also benefit from the Canon Extender EF 1.4x II (~ 275$) which increases the focal length of a zoom by 1.4x.  This would turn our 70-200 into 100-280mm which would give me extra zoom for capturing photos of Pika’s and other woodland creatures.
  • Wide-angle Zoom: Canon EF-S 10-22mm f/3.5-4.5 USM ~ 675$ – I have never been completely satisfied by the sharpness of this lens compared to our other lenses, but it is a critical part of our collection.  Many of the moutaintop vistas, tall trees and narrow valleys around our home just can’t be captured with our 30mm lens.  I also find that I can create an exceptionally broad panorama by taking just a few wide photos with this lens and stitching them together using Windows Live Photo Gallery.
  • Mid-range Zoom: We don’t actuall
    y have one.  An exceptionally high quality mid-range zoom such as behemoth Canon EF 24-70mm f/2.8L USM (~ 1200$) would offer a lot of flexibility in a single package, but it is very heavy and would only slightly exceed the quality we achieve with the Sigma 30mm lens.

You still didn’t tell me what to buy:
That’s right, because it will depend on what *you* want to do with your camera.  What I will say is that you are generally better off buying a lower-cost camera (even a used one) and pairing it with a great lens, compared with buying a camera with a kit lens. 

But I still need a camera!
This really is the easy part.  If you are going with a Canon, buy whatever you can get a good price on.  The latest two models are both great: Canon EOS Rebel XSi is a great still camera, and the slightly more expensive EOS Rebel T1i adds the ability to record videos.  Even the older-still XTi takes great photos, it’s what I use!  I would shy away from the first generation Digital Rebel, because it is a good deal less capable, especially in low-light situations.  That said, in good condition and the right price, it is a perfectly capable camera.

Happy photographing!

Free upgrade to your Canon Point-and-shoot Camera

October 14th, 2009

A quick primer on Digital Cameras:
Most folks who get seriously interested in Photography eventually upgrade to a Digital SLR Camera.  These bulky cameras have a number of features that a cheap point-and-shoot lack:

  • The most obvious difference is the ability to change the lens based on what you are trying to photograph. 
    Some folks make do with a single lens which will be good at everything, but great at nothing.  We carry three lenses at the moment; each is great at something different. (The 10-22 is very wide, the 30mm is fast and sharp, and the 70-200 can zoom and is also very sharp.)
  • One of the other important features of a Digital SLR is that the sensor which gathers light and creates the digital image is comparably large. 
    The sensor of a point-and-shoot is about the size of a tic-tac, whereas the sensor on a SLR is about the size of a postage stamp.  This gathers much more light, and leads to a sharper image with less noise.
  • The last big difference is the ability to shoot in RAW format. 
    Cameras record anywhere from 10-16 bits of information for each pixel in the photo, but when you convert the image to the standard JPEG format, you are limited to 8 bits of information for each color/pixel.  If this conversion occurs in the camera, you get easy to use JPEG files on your memory card, but you cannot go back to the original data if you want to make changes to the brightness or the color balance.  There is no technical reason preventing a cheap camera from saving photos in RAW format, but rather they do not offer this option as it drives sales of higher-end cameras.

So, how do I upgrade my Canon point-and shoot camera?
This is where the hard work of a community of hackers comes in with a program called Canon Hack Development Kit, or CHDC.  They have put together a hack which allows a inexpensive Canon Point-and-Shoot camera to do many things that Canon did not intend.  The most significant new feature is the ability to save yoru photos in RAW format.

I installed their software on my camera and fought through their poorly-designed menus to set it up, but it really works.  I shouldn’t overstate the value of saving RAW images from a low quality camera. There is only a little extra data to work with in these RAW images, and the resulting files are significantly larger than their JPEG counterparts.  The excitement is further weakened by the fact that you have to run a crappy utility (DNG4PS2) on your PC to convert these RAW files into .dng files which are compatible with popular software such as Lightroom.

Update (8:29pm)
I wanted to see if the RAW files from my camera actually contained extended dynamic range compared to the camera JPEG, so I did a quick test.

The images below are crops from an overexposed portion of a photo taken on my Canon SD630.

Image 1. This is a crop from the unmodified in-camera JPEG.
Image 2. I took the in-camera JPEG and decreased the exposure in Lightroom, -4.00
Image 3. This time I applied the same -4.00 exposure to the RAW image.
As you can see, there is definitely additional information in the RAW image which was lost as pure white in the JPEG.

The National Park Checklist

October 11th, 2009

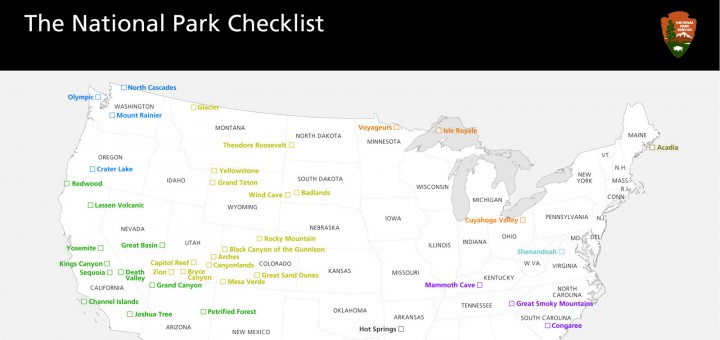
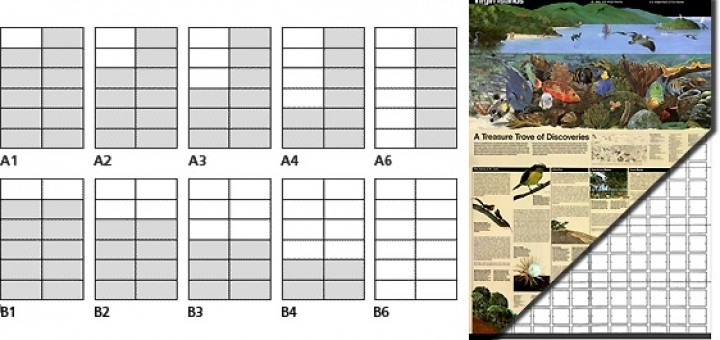
I worked on Amy’s birthday present for about a week, using source material from the National Park Service to create a detailed map and checklist of the 58 National Parks administered by the National Park Service.  We have said that it is a goal to visit all of the National Parks, and now we have a way to keep track!

I tried a few ways to keep track, including a small map with a list of parks that you check off in a separate list below, but I thought it would be more fun if you physically “x” off the parks right where they exist geographically on the map.  I started with this map that contained small dots at each site, and a simple text label.
From there, I removed everything but the 58 actual National Parks, put a checkbox where the dots were, and I color-coordianted the text and boxes to the 9 National Park Regions described in the Passport to your National Parks cancellation book.

To finish it off, I added the standard black National Park Header, and an alphabetical list beneath the map which allows you to record when you first visited the park.

I had initially designed it to be printed on our 13×19″ capable Canon Pixma Pro 9000 Inkjet, but decided to try Costco, which will print a 20×30 print for just 8.99$.  I found reaosnably priced 20×30 frames at Ben Franklin, and I found really convenient adhesive foam core in conveniently enough, 20×30 pieces for 6$ a Michaels.
I am really happy with the final result, which looks really classy in the black frame.  It served as a great conversation piece during Amy’s birthday party, althought we still need to check-off the 11 parks we have visited together.  And, I think she liked it!

The story behind the glossy National Park Brochures

October 5th, 2009
In traveling parts of the United States during the family road trips of my teenage years, the maps and brochures from the National Parks were always interesting to me.  They were of consistently high quality, contained interesting information, arresting photos and featured detailed maps with were both accurate (like the USGS topo’s I had some familiarity with) and had a level of finish quality and artistry that draws you in.
The high quality brochures are not a coincident, they are the result of a long-standing commitment “to create media that effectively communicates National Park Service messages to the public.”  It turns out that “since 1977 the designs of all new brochures have been based on the ‘Unigrid System’ format, created by designer Massimo Vignelli in collaboration with” the park service.  The design only offers sizes which can be printed and cut to evenly divisible sizes based on the large sheets of paper they order for publishing.  I believe that the largest map they produce (B6 in the image below) is 1/4 the size of the paper they use.  Thusly, B4 is 1/6th, B3 is 1/8 and so forth.
The park service offers detailed guidelines for developing literature based on their strict but effective grid system.  They also do most of their high-end mapping and brochure design in a single central office in Harper’s Ferry.

Revised map of Glacier Bay

A specific in-depth article by the National Park Service describes the creation of a new National Park Brochure for Glacier Bay National Park. The article calls out that to make the map, their team collected ”input from staff at the park”  They further went on to describe their research into the primary usage for this map: ”Ninety five percent of visitors to Glacier Bay arrive on cruise ships, never set foot ashore, and are older than the general population of park visitors—thus, large map type is a design necessity.” They also call out “observing visitors using the map”.  Further, the map was not made by just one person, but “a collaborative effort between a writer, graphic designer, and cartographer”. 

It is interesting to see how the project managment of a detailed map is so similar to the process we use in building software.  Research, planning, development, research and refinement are the same steps we follow.

I also learned more through this article about the purpose of each side of the maps that they create.  “The front side of the brochure, which includes the cover, is generally devoted to introducing the park and outlining broad interpretive messages by means of photographs, illustrations, text, and the occasional small thematic map. The second side of the brochure, containing practical visitor information including the map, is more subject to change.”  I did not realize that they deliberately separated the content by sides based on the likelyhood that the information would need to be updated.

Further Thoughts:

  • Since the park service is a government agency, everything they do is in the public domain.  They offer the illustrator/photoshop files for all of the national park system maps free to download.
  • A review of the Unigrid system.
  • I am amazed, but I cannot find anyone on the web that specifically collects national park maps/brochures.  I thought someone out there collected everything.

The History of the National Park Service

October 2nd, 2009

I love the National Park Service.  The locations they administer are almost always of great natural beauty or historical interest, and the facilities they administer within their parks are well managed, clean, and informative.  The people work in the parks are intelligent and well informed, and the literature and signage is consistent and well implemented.

The history of the National Park Service is very interesting.  It was the first federal reserve system in the world of it’s kind, and it came together through a joint effort between dedicated naturalists like John Muir, and some happy coincidences.  It turns out, the first park, Yellowstone, was set aside as a park on the grounds that it’s inhospitable nature made it useless as a source of natural resources and agriculture, so it may as well be saved as a park.

This history has been painstakingly documented by the famed documentary filmmaker Ken Burns in a new PBS Series which aired this week; National Parks: America’s Best Idea.  The history of the park service is detailed in a 6-part, 2-hour series.  Thus far, we have learned about how Yosemite started out as a precursor to the formal park service, followed by Yellowstone which was dedicated as the first park.  This was followed by preservation of the Yosemite upcountry, Sequoia and additional park areas in California.  John Muir leveraged his growing celebrity and the newly formed Sierra Club to elevate our own Mt. Rainier to National Park status in 1902, making it the 5th National Park in the United States. 

We are only through the first 3 hours, but have enjoyed the series thus far.  It is strictly chronological, which means that the narrative jumps around from time to time, but the resulting program is extremely interesting.  This is only feeding into our desire to visit as many sites administered by the National Park Service that we can, including all 58 National Parks.

National Parks are now defined worldwide as “relatively large area with particular defining characteristics”.  Many other sites are administered by the National Park Service under different distinctions.  A smaller area might be a National Monument.   An area of historical relevance would be a National Historic Park or National Historic Site depending on the size and complexity.  They also administer Rivers, Lakeshores, Seashores, Trails, Parkways, and National Recreation Areas.

The $ of Food

October 1st, 2009
As my wife called out in her blog today, we bought a ton of local produce at the farmer’s market and we are in the process of converting it into frozen pasta sauces and soups for the colder months.
This raises an intersting question about the ($) cost of preparing local food for use later in the year versus buying your food at the store. 
Potato Leek Soup (Fourteen 12oz portions)

Potatoes (4$), Leeks (1.5$), Onion (1$), Green onions from the garden (worth 1$), 3 boxes of Chicken Stock (9$) = 16.50$ for 168oz (5.25$ for 32oz versus 3.69$  in a grocery store.)
Verdict: A little more expensive, although a major ingredient was store bought anyways.  Do it for the taste, not the savings.

Tomato Basil Soup (Six 12oz portions.)
4 lbs tomatoes (3.75$, due to negotiated bulk price with market employee), Basil from the garden (worth 2$ or more), Onions (1$), garlic (.50$), chicken broth (2$) = 9$ for 72oz  (4.00$ for 32oz versus 4.29$ in a grocery store)
Verdict: Actually saving a little money to eat locally, although the price is biased by the low negotiated price for the tomatoes.

Pasta Sauce (Fifteen 12oz portions.)
16lbs tomatoes (12.50$), 4 peppers (2$), 1 onion (1$), Basil from garden (worth 2$) spices & oil (.50$) = 18$ for 180oz. (2.40$ for 24oz versus 3.79$ or more at the grocery store)
Verdict: Decent pasta sauce is expensive in the grocery store.  There is money to be saved here if you can find cheap enough tomatoes, and almost everything is local!

Note, three important costs are not being accounted for:

  1. Storage: We bought semi-reusable glad and tupperware containers for this project at about 75 cents a container, but they are reusable so their cost goes down over time. besides, we could ahve just as easily used reused butter tubs or similar.
  2. Power: Running your existing freezer with a few extra items actually saves power over the long run, but running a second freezer is not free.  We might invest in a chest freezer for next year, so this is a cost that must be considered.
  3. Time: If you value your time even the slightest bit, and you don’t enjoy processig and preserving food, then this would be really hard to justify.