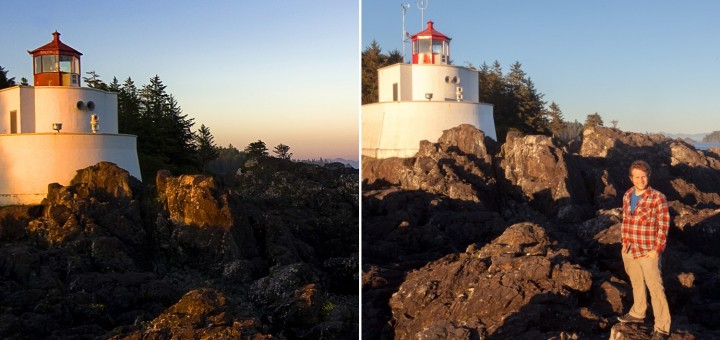
Archive for the ‘Photography’ category

I’ve been off WAC’ing.

May 11th, 2010

Washington Alpine ClubAs you may have noticed, I haven’t been very active on the ol’ blog in the past two months.  It’s not because I am bored or lazy; I’ve been extremely busy!  The main culprits are: work, a fantastic one week trip to Utah, gardening and a little thing called the WAC.

I am enrolled in the Washington Alpine Club’s Basic Climbing Class.  It is an introductory course to mountaineering, starting from the basics.  The class covers snow travel, pooping in the woods, rock climbing, snow camping, ice travel, Self arresting, rescue techniques, Avalanche preparedness, setting up and traveling as a rope team and no doubt much more.  The “final” project for the class will be a summit bid on Mt Baker.

Mt Si: The very first trip was a test.  We were challenged to carry a full pack up Mt. Si in under two hours.  (The pack totaled around 30 pounds of gear as required by the instructors.)  It was weird hiking in a massive group with an artificial deadline, but I made the time without a lot of difficulty.  (It didn’t hurt that I summited Mailbox with a significantly heavier pack the week before in 2.5 hours as practice.)  At the top, we learned some basic skills in three stations: Knots, Emergency Bivy and Map and Compass.  They even had a mini orienteering course for us to practice our compass skills on.  We even had a little snowfall while we were at the top, which was fun.

Emergency Bivy practice on Mt. Si.

The main thing I learned that weekend was that I am in pretty good shape, and that I already have a good foundation in the basic skills.  I also learned that you get much colder standing still than moving about.  Standing on a piece of foam can make a difference in keeping your feet warm.

Spire II: The second and third trips were consecutive weekends at Spire Rock near Tacoma.  It is a man-made outdoor climbing area where we practiced climbing, rappelling, ascending a line, orienteering, and more.  (All in mountaineering boots, not rock climbing boots!)   I missed the first weekend in Utah, but they covered pretty much the same material both weekends.

Practicing belaying & rappelling techniques at Spire Rock.

The big learning for me here was that I still don’t enjoy rappelling, particularly with a large pack.  A broad stance helps you keep your footing and prevents you from toppling over.  Finally, prussiking up a vertical line, especially with a pack is a huge pain in the butt.  Not only is it slow, but I found my prussik knots kept getting jammed up and needed to be re-dressed every time I weighted the knot.  I don’t know if more wraps or less would have been better.  I do think a Bachmann knot (around a carabiner) would have been much easier, at least for me.

Mt Erie: The third trip took our skills to real rock, at Mt Erie, near Anacortes.  Here we did more of the same, but on longer pitches of real rock.  This was our first weekend wholly belaying each other, and some of the long belays with a heavy pack were pretty nerve-racking.  I completed several pretty tough routes, at least given that we were still wearing boots.

Nice weather arrived at the end of the day.

I learned that rappelling with an autoblock is annoying, but less annoying if you place it on your lower leg loop and as far back as possible.  This allowed me to use more of my leg to slow my descent and is much more comfortable.  I don’t know why I thought the autoblock should go on your waist belt near the ATC, this is clearly not as good.   I also finally got some decent photos on this trip.

Snow I: The most recent trip really galvanized the skills for me.  It was a weekend of Snow Camping, Self Arresting, Building and testing various Snow Anchoring techniques, Snow Travel, further practice on a Rope Team,  and given the unseasonably large amount of snow we received (all day, both days) we got a LOT of extra experience testing the waterproofness of our gear and practicing snow travel in fresh deep snow.  The final celebration on the first day was a cooking contest where each team competed to create the tastiest and most thematically strong dinner.  Not wanting to miss out on the competition, the Instructors surprised us with fantastic appetizers too.  The winning teams prepared Indian Food and Jamaican Food (complete with rasta dread-headed costumes.)

The Ascent to our snow camping area near the top of Alpental Chair 2.

I can’t begin to list everything I learned this weekend, but the biggies are threefold:

1) My gloves were not adequately waterproof, and you need an excellent glove system when you need to get your hands out to do things frequently in a wet environment.  The right gear and knowing how to use it is crucial.

2) I am horribly bad at following or kicking steps in very soft fresh snow.  I know I am pretty heavy, especially for my small size 9.5 feet, but this was maddeningly hard for me.  The learning is that keeping your weight on the toes and stepping up gently without the forceful push-off on the lower foot is crucial.  I haven’t got it down quite yet, but I know what I need to work on.  I even went to the gym and practiced stepping gently on the stair machine to get ready for the alpine climbs.

3) Ice Axe arrest is not something you want to need to use.  It works, sometimes, in certain snow conditions, but it is tricky to do well, especially when you start off sliding down hill head first on your back.  I don’t think this is completely a programmed response yet, but with the two days of practice I am getting there.

Group Photo at the Snow Kitchen we made during  Snow 1.

4) I nearly forgot, but I also learned that Photography in wet snowy conditions, particularly right around the freezing point is very difficult.  Everything gets wet, which isn’t great for the camera gear, but more troubling, the lens fogs up completely.  With nothing dry on my body, I couldn’t wipe the condensation free.  Further, I found the bulk of an SLR really is a burden when traveling on snow.  I’m not sure I can imagine carrying an SLR on all of the alpine trips, and may seriously consider a different camera for those trips.

So far, the class has been great and I look forward to the alpine climbs.  It’s a little hard to believe that the class is more than half complete, but I have learned a lot.  I certainly look forward to learning more through the class itself, and subsequent trips with my new friends in the Washington Alpine Club.

Processing Digital Photos, from the Camera to Screen or Print

October 25th, 2009

Anyone who takes a lot of photos knows that the time spent behind the camera is only one small step to getting an image you are proud of onto the web or printed.  Higher-end cameras tempt you to make this process harder by capturing your photos in their RAW format whihc requires processing to get the photo into the industry standard JPEG format which you can send to your friends and your mom.

The leader in RAW processing is Adobe with their popular Adobe Photoshop Lightroom application, now in version 2.  Lightroom makes it possible to assign tags to your photos, rate them and apply improvements to the colors, brightness and contrast before exporting a JPEG file to post to your blog or to send to the printer. 

Workflow:
While Lightroom is more powerful and easier to use than some of it’s competitors, I would hardly call it “easy”.  Photographers describe the myriad of steps they use to take a RAW digital photo on the camera and turn it into something that they can share “Workflow”.

My workflow is probably less complex than most professional photographers, but it is still cimbersome enough that I regularly get months behind in processing my photos.  My workflow begins in the first tab in Lightroom labeled “Library”.  In this phase, my goal is to 1) label the photos appropriately so I can get back to them in the future and 2) identify those photos which are good enough to share, and those which look like they could be great.

1) Labeling
To label the photos, I assign tags to the people in the photo, and will sometimes add a short description of the photo.  This is also when I try to assign the location where the set of photos was taken by specifying the Country/State/City/Location.   Recently, I have tried to assign coordinates to my photos by using clever software that uses a tracklog with the timestamp on the photo to interpolate where the photo was taken. (A tracklog is a recording on a GPS device of where you are every 30 seconds.)  Lightroom should really include built-in support for this, but in the meantime a person named Jeffrey Friedl has created a Lightroom plugin to assign the coordinates where a given photo was taken based on a tracklog from the same period. 

I also assign a Star rating to the photos which I like.  Roughly speaking, I assign 2 stars to any photo which is either decent, or a poor quality image that is important to tell the complete story of an event.  I try to assign 3 stars to the best 2 to 4 photos of a given event.  These are good photos, but not my best.  4 stars is meant to mean “excellent”, a photo which is great both in subject and composition.  5 stars is a concept I challenge with.  I know my photos could always be better so I am hesitant to give anything this rating.  I do take good photos, so I should me more willing to rate a few photos a year “5 stars”

2) Processing
After tagging, I must process the photos.  This varies greatly from photo to photo, but the most common changes I make are an adjustment to the brightness of the image, the increase of Contrast, and tweaking the balance of brightness and contrast in the shadows.  I also use the Neutral Density Gradient filters pretty often to correct a blow-out sky.  If none of this is enough to make the subject, usually someone’s face, bright enough or having enough contrast, then I will use the localized tools to correct the broghtness / contrast in an area of the image.  Both of these localized edits are new to Lightroom Version 2

Finally, after tagging and processing, I export my photos which are 2 stars or greater into my public photo library.  This generally yields 1/2 to 3/4 of the original photos.  When I export photos, I keep the standard resolution and set the JPEG compression settings to 80 of 100.

When friends and family pop the question…

October 20th, 2009

“… I am planning to buy a Digital SLR, what should I buy?”  I’ve received variations of this question from friends and family recently.  It is a difficult question to answer because it’s actually the wrong question.

The reason is best explained in an example:
People who are new to photograhy might say “nice camera” to a photographer using a SLR, but photographers rarely comment on another photographers camera, they would instead comment “nice lens!”  This is in part a reflection on the fact that most high-end lenses cost more than the camera that is attached to it, but it is also reflected in the photos you can take.

To make a long story short, the cheapest Digital SLR on the market can take beautiful photos with a high quality lens, but the best camera will take relatively poor photos when coupled with a cheap lens under anything less than ideal conditions.

So, what should they ask?
The decision to Buy an SLR is a decision to buy-into the idea that the best lens for each situation is different.  A single lens of exceptional quality that captures a lot of light across a broad range of focal lengths (zoom) will have two problems: It will be exceedingly heavy and large, and it will be astronomically expensive. 

  • If you want a one-size-fits-all solution, you would be better served with the highest-end point-and-shoot camera with a built-in lens.  There are excellent options in this category such as the Canon G10 and Panasonic LX3 which both offer a failry standard zoom range and excellent image quality.  If you want more zoom (20x) and will accept slightly degraded inage quality, several products offer great value.  (Many even offer RAW capabilities, which I will describe more later.
  • If you do like the idea of interchangeable lenses, but the size of an SLR is overwhelming, it’s worth exploring the new Micro-4/3 system in camera such as the Panasonic Lumix GF1.
  • If you’ve cosidered your options, and still think an SLR is right for you, then the important question you should answer is “what do you want to take pictures of?”.

Picking the lens(es):
Before you pick a camera, determine what lenses you need.  I will only cover the most common categories for someone new to SLR Photography: Midrange Zooms, Midrange Primes, and Telephoto Zooms.

  • Fixed-length Prime: A Prime lens is a fancy way of saying it cannot zoom in and out.  Prime lenses almost always result in better picture quality when you factor in the cost of the lens. Further, an inexpensive fixed-length lens can often produce great results whereas a inexpensive zoom lense will produce poor results in anything less than perfect conditions. (100$ or much more.)
  • Mid-range Zoom: This is the most common lens people use since most SLR’s come with a “kit lens” in this range. They range from reasonably wide (~20mm) to reasonably zoomed in (~100mm). The lower-end lenses in this category are often not very sharp, and photos can have weird effects that are hard to describe. (lens flares, spots in the image, rainbows on sharp lines of contrast, etc…) The lower-prioced lenses also are “slower”, meaning they gather less light, so the lens must remain open longer to get enough light to capture the picture. The generally work alright outdoors but are difficut indoors when there is less light. The excellent lenses in this range are very expensive (500$ or a good deal more.)
  • Telephoto Zoom: A Telephoto lens is used to take pictures of things that are far away. (80mm or greater) While it is possible to achieve good photos with a less expensive lens in the mid-range, a inexpensive zoom will be extremely frustrating. I would not worry about getting a telephoto zoom initially unless wildlife photography is something you really want to do.  A reasonable telephoto zoom lens will start around 500$ and increase as you add Image Stabilization, (which is especially important for a zoom lens) a faster lens and sharper optics.
  • Wide-angle Zoom: A wide-angle lets allows you to capture a large scene in a single shot.  Due to the complexity in bending a broad scene into a single frame, these lenses tend to be expensive, and are only so sharp.  Further, a photograph taken with a wide-angle lens can have a distorted effect, since a scene that bends around you is being captured on a flat surface.  The best results are usually achieved in natural environments without people, as the distortion is less noticeable.

So, What do we use?

We have a fairly straightforward kit: 2 mid-range primes, a Telephoto Zoom and a Wide angle Zoom.
  • Mid-range Prime: Canon EF 50mm f/1.8 II ~100$ – This lens is extremely inexpensive and sharp.  50mm is a mild zoom given the crop factor of sub-2000$ Digital SLR’s, so it is great for portraits of people or many scenes around town or out in nature.
  • Mid-range Prime: Sigma 30mm F1.4 EX DC HSM ~ 375$ – This is our favorite lens for everyday use.  30mm is just a hair wider than natural, so most scenes fit into the picture, both indoors and outside.  This ultra-fast F/1.4 lens makes it possible to take photos indoors without a flash, and you can drop it down to a modest F3 to get exceptionally sharp photos outside.
  • Telephoto Zoom: Canon EF 70-200mm f/4L USM ~ 550$ – This is the sharpest lens we have and the only lens we have in Canon’s famously sharp “L-series”.  I chose it based on the comparably low price, and the relatively low weight which makes it great for hiking.  At only F/4, this lens requires bright sunlight to get the shot. 
    • We would be better suited by the Image Stabilized version of the same lens. (f/4L IS, 1050$) It keeps the same low weight, but allows you to take sharp photos of a non-moving subject with about 1/4 the light.  The price difference is staggering.
    • We would also benefit from the Canon Extender EF 1.4x II (~ 275$) which increases the focal length of a zoom by 1.4x.  This would turn our 70-200 into 100-280mm which would give me extra zoom for capturing photos of Pika’s and other woodland creatures.
  • Wide-angle Zoom: Canon EF-S 10-22mm f/3.5-4.5 USM ~ 675$ – I have never been completely satisfied by the sharpness of this lens compared to our other lenses, but it is a critical part of our collection.  Many of the moutaintop vistas, tall trees and narrow valleys around our home just can’t be captured with our 30mm lens.  I also find that I can create an exceptionally broad panorama by taking just a few wide photos with this lens and stitching them together using Windows Live Photo Gallery.
  • Mid-range Zoom: We don’t actuall
    y have one.  An exceptionally high quality mid-range zoom such as behemoth Canon EF 24-70mm f/2.8L USM (~ 1200$) would offer a lot of flexibility in a single package, but it is very heavy and would only slightly exceed the quality we achieve with the Sigma 30mm lens.

You still didn’t tell me what to buy:
That’s right, because it will depend on what *you* want to do with your camera.  What I will say is that you are generally better off buying a lower-cost camera (even a used one) and pairing it with a great lens, compared with buying a camera with a kit lens. 

But I still need a camera!
This really is the easy part.  If you are going with a Canon, buy whatever you can get a good price on.  The latest two models are both great: Canon EOS Rebel XSi is a great still camera, and the slightly more expensive EOS Rebel T1i adds the ability to record videos.  Even the older-still XTi takes great photos, it’s what I use!  I would shy away from the first generation Digital Rebel, because it is a good deal less capable, especially in low-light situations.  That said, in good condition and the right price, it is a perfectly capable camera.

Happy photographing!

Free upgrade to your Canon Point-and-shoot Camera

October 14th, 2009

A quick primer on Digital Cameras:
Most folks who get seriously interested in Photography eventually upgrade to a Digital SLR Camera.  These bulky cameras have a number of features that a cheap point-and-shoot lack:

  • The most obvious difference is the ability to change the lens based on what you are trying to photograph. 
    Some folks make do with a single lens which will be good at everything, but great at nothing.  We carry three lenses at the moment; each is great at something different. (The 10-22 is very wide, the 30mm is fast and sharp, and the 70-200 can zoom and is also very sharp.)
  • One of the other important features of a Digital SLR is that the sensor which gathers light and creates the digital image is comparably large. 
    The sensor of a point-and-shoot is about the size of a tic-tac, whereas the sensor on a SLR is about the size of a postage stamp.  This gathers much more light, and leads to a sharper image with less noise.
  • The last big difference is the ability to shoot in RAW format. 
    Cameras record anywhere from 10-16 bits of information for each pixel in the photo, but when you convert the image to the standard JPEG format, you are limited to 8 bits of information for each color/pixel.  If this conversion occurs in the camera, you get easy to use JPEG files on your memory card, but you cannot go back to the original data if you want to make changes to the brightness or the color balance.  There is no technical reason preventing a cheap camera from saving photos in RAW format, but rather they do not offer this option as it drives sales of higher-end cameras.

So, how do I upgrade my Canon point-and shoot camera?
This is where the hard work of a community of hackers comes in with a program called Canon Hack Development Kit, or CHDC.  They have put together a hack which allows a inexpensive Canon Point-and-Shoot camera to do many things that Canon did not intend.  The most significant new feature is the ability to save yoru photos in RAW format.

I installed their software on my camera and fought through their poorly-designed menus to set it up, but it really works.  I shouldn’t overstate the value of saving RAW images from a low quality camera. There is only a little extra data to work with in these RAW images, and the resulting files are significantly larger than their JPEG counterparts.  The excitement is further weakened by the fact that you have to run a crappy utility (DNG4PS2) on your PC to convert these RAW files into .dng files which are compatible with popular software such as Lightroom.

Update (8:29pm)
I wanted to see if the RAW files from my camera actually contained extended dynamic range compared to the camera JPEG, so I did a quick test.

The images below are crops from an overexposed portion of a photo taken on my Canon SD630.

Image 1. This is a crop from the unmodified in-camera JPEG.
Image 2. I took the in-camera JPEG and decreased the exposure in Lightroom, -4.00
Image 3. This time I applied the same -4.00 exposure to the RAW image.
As you can see, there is definitely additional information in the RAW image which was lost as pure white in the JPEG.